Adventures in Tech Art: Procedural R&D

Our project required a procedural environment system and I was both available, very interested, and somewhat experienced in procedural content generation so I offered up my talents and enjoyed a 2-3 week period of explosive research and development. I'm going to let the images do most of the explanations from here on out.

After the general paths have been laid out, the voxel data is walked and each voxel must be assigned a tile that conforms to its metadata.

I'm very happy with the results of this research and the amount of knowledge I gained in the process. I look forward to my next brush with procedural content generation, whenever that may be. Here's one of the final results with an expanded tile set to pull from.

Adventures in Tech Art: Content Export Pipeline

The content export pipeline was one of the longest and most involved tool creation and maintenance tasks during my time at 5TH Cell, but without a doubt was the most important to general production and the art team's ability to do their jobs effectively.

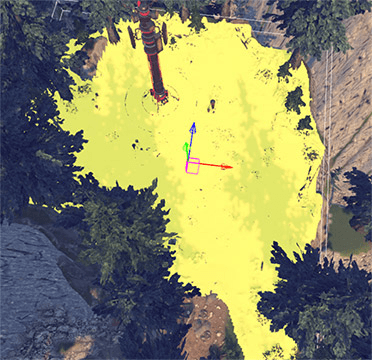
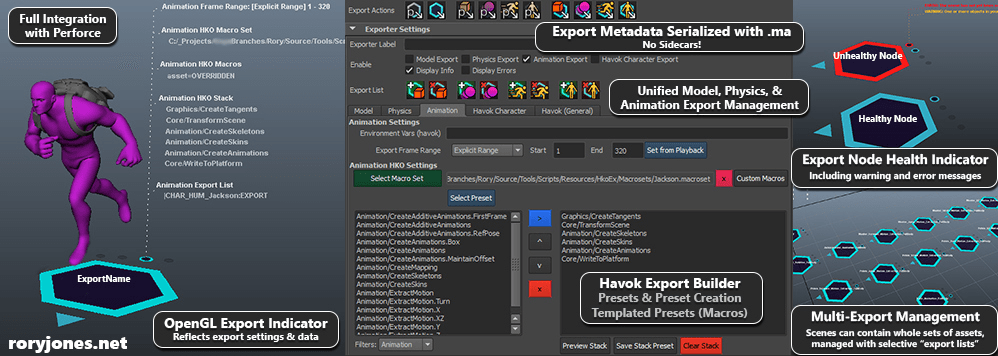
One of the most important pillars of content pipeline and management was health and export-readiness. Through past experience I've learned that there's nothing that degrades asset source files more than loose export and scene management processes. It's a hotbed for tribal knowledge and data loss. This need for simple, carefree export in any scene file, with no previous knowledge of the scene or content lead to one of the coolest aspects to the exporter pipeline: the in-scene Export Indicator.

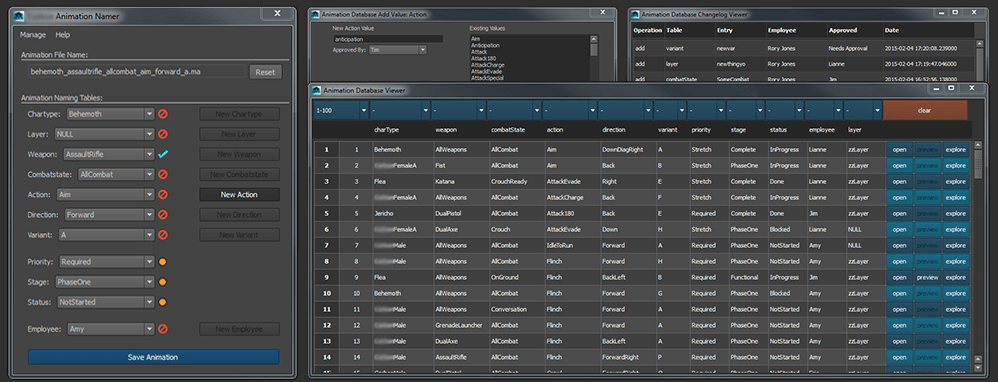
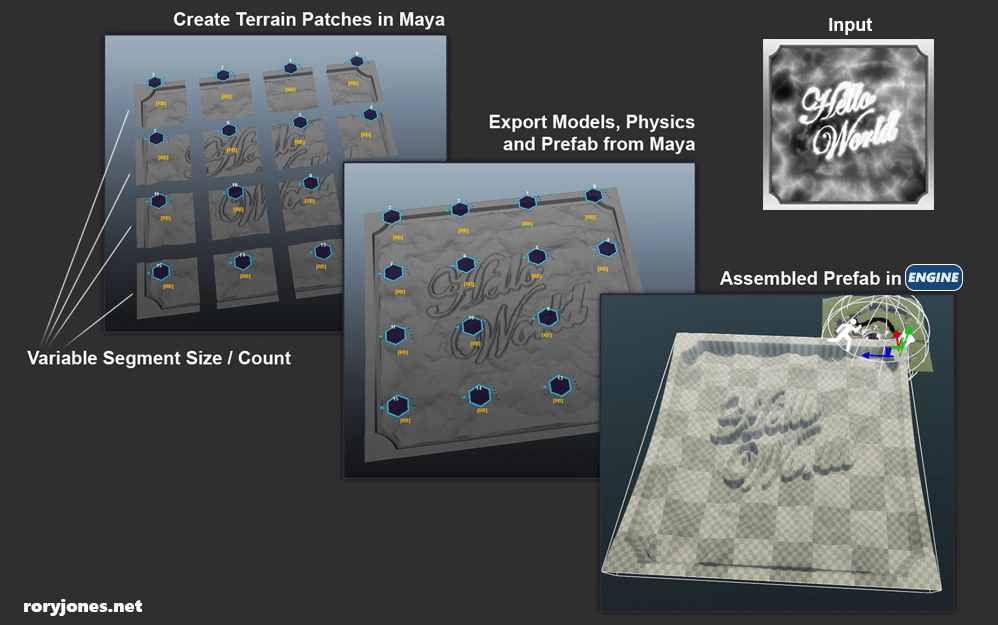
The Export Indicator is the scene node through which you manage all export settings on a given asset. It gets rendered via some custom OpenGL I wrote and reflects the state of the node in a highly-visible way. One node per asset and you're ready to export (model, physics, animation on a single asset can all stem from one node). The addition of scene-serialized metadata and multiple nodes allowed artists to create scenes with multiple assets, modular packs ready for export, without any complicated export processes, cryptic naming conventions, or sidecar files. An artist just needed to create another node, add a suffix (to use while auto-generating the asset name), then add any desired geometries, bones, etc. to the node's Export List through the node's UI. Once an export is triggered the export process would automatically iterate over all nodes and export each selective asset from the scene hierarchy.

Our model exporter and format was proprietary (almost like a verbose obj), but all other data was being managed through Havok. I was able to unify everything into one UI, simplifying a previously disjointed and largely hidden export management workflow. The benefits of providing appropriate feedback to artists cannot be understated!

In my next pipeline post I'm going to cover the foundation of the entire pipeline at 5TH Cell - a lot of which can be credited for making these other tools so easy to create and rollout. As much work as the export process was, the base pipeline and environment was more than double the size, scope, and level of effort. I'm really excited but it's taking quite a lot of time to write and design, I might even need to break it into multiple parts! Coming soon!

Adventures in Tech Art: Batch Tool

One of my favorite pieces of interesting, complicated, slightly misunderstood but entirely useful and successful pieces of tech was the batching tool I created to carry out various actions in bulk - the primary use case was to export assets from Maya. Whether you need to fix some data in a lot of export files, source files, need to re-export through a new version of your pipeline, or you just want to continuously build all content files to ensure the health of the content library, there are many times in production where you need to do something 10,000 times, automatically.

Actions were defined by python scripts, each one could be fed any number of input parameters. A series of actions would be combined into a job manifest (xml) and the batcher would execute those jobs in order until they were complete. The tricky part of making this useful and performant, was utilizing the command port feature in Maya. Through this, I could open a background instance of Maya with my pipeline loaded and send any number of actions to it through that port (I could also target Photoshop and other command-line accessible processes).

After some real-world use, I realized there was a resource ceiling with single instance of the background Maya, so I quickly rewrote it to segment the job into N pieces and spin up anywhere from 1 to 8 separate batchers in order to carry out actions in parallel. This was a predictable improvement of action time, and at full bore meant 1/8th the amount of time from start to finish. Projections of our final asset library footprint estimated the simplest, unoptimized iteration method (foreground, single instance of Maya) would be able to move through our asset library in around 13 days. Moving to an 8-wide parallel set of background Maya instances reduced the turnaround estimate to around 7 hours. I was in the process of researching distributing this across the office LAN when I was called to another adventure.

To make this a little more useful (and course-correctable) for long-haul jobs I put together a system by which the action data was exported and displayed via a live webpage. The custom controls below show success rates for each node (batcher process) and itemized the results of each job in a list format. This feature was far from complete, but could actually relay live data from a given job's results data. This was one of my first (but far from last) steps into web-based tools for game development.

Adventures in Tech Art: Data-Driven Texture Pipeline

A key part of the content creation pipeline is your photoshop tools. We rolled a really nice exporter that was very particular about how files were structured. It wasn't a technical limitation, we primarily used it as a quality control measure to ensure our texture source files were kept clean and standardized.

The Texture Setup Wizard became essential in creating correct and standardized hierarchies. Rather than write separate tools for several projects I decided to write a really fluid, data-driven system that builds it's UI and drives the export process from config files managed by the artists themselves - much like the Animation Database Toolset, I never wanted tech to become a bottleneck. So, through the management of some basic javascript objects (keeping all the real tech hidden) artists could add new standard texture map types to the list, non-standard map types to the drop-down menus, entirely new texture paradigms (say we wanted to switch between or support both PBR models), even create custom-swizzled maps with proper labels and grayscale layers that get combined into RGB(A) maps on export. It was a really interesting technical challenge and ended up being a really successful tool. Check it out below!

The exporter itself was fairly predictable. One button and it would export all the correct maps to all the correct filenames, filetypes, and locations. No big deal. Of course, it too was driven off the data you see above!

Adventures in Tech Art: Animation Database

While making a third person adventure game with a lot of hero characters, combat styles, traversal methods, and weapon types one can expect to create and manage several thousands of animations. Correctly creating and keeping track of these assets can be a difficult and time consuming and every ounce of overhead weighs heavily on our 5 person animation team. Enter the Animation Database and Toolset. I also owe a huge thanks to our technical animator Jim Winquist for providing a lot of help and guidance in the creation of this tool.

The Animation Namer (left) helps enforce naming conventions and is the main means of committing a new animation or saving an existing animation. While this is an SQL database of metadata, all animation and source files are stored on Perforce. This tool triggers all necessary p4 actions for the artist, streamlining the authoring process. Fields are auto-filled based on the pipeline environment, scene data, etc. (+90% of fields) and everything is validated before allowing the user to submit their changes. Invalid fields appear to require attention making it very easy to navigate when something is incorrect. Admin options are available based on permissions and the user's tools environment (more on this in another post) allowing easy and safe modification of the available options to authors. In the event a new weapon, character, or otherwise needs added I could safely assume tools would not become a bottleneck to the animation team's progress.

The Animation Database Viewer (left) helps artists and leads find what they're looking for. All columns could be isolated in tandem to quickly isolate content. Quick options to open the file for edit in Maya, preview the animation in the Havok preview tool, and show in explorer also proved useful.

The Animation Database Add Value (back left) is a fully templated control allowing universal editing of database options.

The Animation Database Changelog Viewer (back right) was added as a basic means of historically and chronologically tracking changes to animations.

This tool proved really helpful to our animation team and soon after I wrote a much less complex but very useful tool for browsing all project scene files with the same quick controls for editing and showing in explorer.

Adventures in Tech Art: In the Trenches
Projected mesh overlaid in engine to assure alignment

It's story time...

Being a tech artist isn't always a glorious job, sometimes you need to get your down in the muck to help your fellow artists achieve their goal. To a certain extent that's what Adventures in Tech Art is all about. This isn't a long one, but it's one of those times where proper lines of communication and a great relationship with artists let me know of the problem and knowing the game development process from end-to-end really helped me generate a quick solution.

We needed some previs animation to help define combat and we wanted it to happen at a point of interest created by the designers. The only problem is our location was built in-engine with modular assets and terrain but our animation tools are in Maya, of course. It took me a number of hours and a couple trips to the graphics programmers to know where I could locally crack into the rendering pipeline, but I managed to get our animator moving.

I created an ortho camera at the location desired, sqeezed the near and far planes to get maximum detail from the frame, stored the position data for offsets later, and dumped the depth buffer to a 32-bit image. I then went into Maya, created a segmented plane, offset the vertices, performed a little math to ensure proper scale, placement, and conversion between left and right handed coordinates :/, confirmed my results (right) then sent the Maya scene file over to our animator to get moving.

The very talented Tim Borelli did the animation, you can find it on his reel at 0:13 here or check it out below.

Adventures in Tech Art: A Shoestring Terrain System

I'm starting this series as a way to present a quick rundown of tech I've written over the years. These will be broad overviews but depending on time and availability I'll be forming more in-depth breakdowns of my tech while providing greater detail as to what problems I was trying to solve, why I chose a specific solution, what course correction was needed, what I felt succeeded or failed and how I would do it differently "next time." Without further ado, here's the first entry in Adventures in Tech Art.

The design of our game had a number of changes as did our in-house engine tech. Through a necessary advancement of the overall engine's performance and stability our beatifully-written, budding capability to edit and streaming terrain were shelvedand our milestone was looming - we needed a solution and fast. So was born the first iteration of my terrain system.

World Machine provided a base heightmap and our artists used various sculpting tools to paint those heights and vertex data for splat maps. We had all this high-frequency data but no good process through which we could load it into the engine and show it. So I wrote a process in Maya python to load the heightmap data, segment into a given number of x and y chunks, and export them through our proprietary model format. I also constructed the proprietary layer ("scene") in which the terrain chunks were placed, providing an end-to-end solution for artists to easily push new terrain into the game.

Through some optimization the overall import/export process was lowered to 33 seconds, even at the highest density requested by our designers and environment artists! The ability to alter the segment count and size really helped them dial in what fit right in the project.

The project design requirements evolved over time and a new authoring method was required, so I pitched my ability to create a tiered-editing mode, the features of which are outlined in the following image.

Leaving Technical Art @ EA
It's like they own me!

I've had a great time at EA Sports and met so many talented individuals, but I'm moving on to explore other opportunities. Thanks to all for the great times working on Madden and NCAA.

A list of my accomplishments while with EA:

  • Extended several art creation toolsets for new features of Madden NFL and NCAA Football, streamlining the artist workflow (Python, MEL, C#, Windows Command Line, Perforce)
  • Create/expand art library sampling tools to make unique character creation more efficient (Python, MEL, C#)
  • Shader development to extend preview options and art creation functionality in artist toolsets (CgFX)
  • Large scale asset management integration with scripts (Python, MEL, C#, Windows Command Line, Perforce, Proprietary Asset Management System)
  • General artist support, debugging tools/workflows and runtime, critical paths testing (Xbox 360 and PS3)
  • Tuning of automated build systems, parsing large volumes of data for key information on bugs, build errors (Python, Build Forge)
  • Worked with a centralized team of over 80 individuals, handling game assets and art creation tools for several titles
Hue-Saturation Modulation Shader

This is a shader written in CGFX to provide vertex color control over the HSV manipulation of a texture sample. It was written in response to the need to create a large number of environments in a small timeframe, all with varying texture characteristics, but a limited texture footprint. The given example is seasonal, though the applications are quite numerous for this kind of functionality. This shader also includes vertex lighting and fresnel rimlighting to support the look desired.

Panorama Environment and Content Generator

A popular practice for a previous employer was to deliver 3d content in the form of an interactive flash panorama viewer.

I created this cubemapping / interactive panorama generation script to relieve artists of the responsibility of creating hotspots, or interactive (clickable) portions of the panorama, by hand. It was especially time consuming because the artist also had to isolate the object and rotoscope it out to create a detailed clickable area instead of a rect.

Enter my script: First a cubemap is created for the panorama. The 3d transforms of all artist-designated hotspot items (encased in blue spheres for artist feedback) are mapped properly into the panorama coordinates and written to an XML file that the viewer reads in. These nodes can also be used simultaneously in the same scene to create a network of node-to-node travel within the XML.

Lightning System

This script generates random lightning strikes around an epicenter (generally the player location or a fixed point in the environment, in this case "CoffeeTable" was close enough). Each strike generates a flash of light and randomly samples audio from the Thunder audio bank. Since this was primarily created for use with interior environments, sound was the emphasis.

Artistic control over the generation of lighting bolts is added through some easy to use parameters. Pitch and Volume variance are linearly inerpolated between Min and Max values using the distance between Viewpoint and the generated strike in relation to the maximum radius, providing an accurate depiction of lighting strikes near to far while efficiently using only a handful of sound clips. Frequency is used to control the severity of the storm. Wait To Strike is the minimum time that must have passed in order for another lightning strike to be generated to prevent an unnatural overlap. The result is a convincing ambient stormy setting.

Light Set Swap

At the time, Unity3d had no native ability to control active lightmaps and switch between them once the scene is loaded. The project called for a power outage, so that ability was a necessity. Artists create a light set (theoretically any number of them), light the scene, bake lighting to lightmaps, associate the lights and generated lightmaps with the desired light set. The end result is a lighting swap that can be triggered by any event.

Vehicle and Player Control and Interface

Design of the vehicle rigging solution was achieved with the combined effort of a software engineer and myself. My responsibilities were centric to player-vehicle interaction and more artistic concerns like wheel rotation and tread scrolling.

The HUD items seen here were prototyped by the software engineer, I then optimized functionality, re-faced with final art, added mobile-friendly interaction.

Footprint Tool

Each building prefab has its own object space footprint for ease of editing and repeated placement. Upon script execution, a collective scene footprint file is built (CSV) for storage on the server. I learned MaxScript to write an authoring tool for these footprints straight out of the modeling program. Given more time I would automate the creation of footprints.

Terrain Modifier

Unity3d's terrain tools have no native ability to alter the initial parameters of a terrain without losing modifications made by artists to the initial data import. Well into the process of customizing the USGS terrain data, an artist noticed their terrain was mirrored from what appears on the real world map. This script prevented a loss of terrain data that would have cost the artist several extra days of corrections. Development was organized to eventually add additional features like crop/resize, resolution modification, automated foliage generation (by diffuse color or terrain height).

USGS / Hydro Data Visualization

While working as a Data Visualization Programmer, I was presented with a project to help analyze data along the Illinois River. The design specification was to:

Develop proprietary software in C++ to generate interactive models of USGS digital elevation map data in a real-time OpenGL application with a large array of data manipulation tools and customizable viewing filters and to support animation of river data sets to highlight occurrences of river breach.

Here is a video to help demonstrate the majority of this program's functionality: